
Hello there, fellow green thumbs and aspiring gardeners! Today, let’s dig into a topic close to my heart and beneficial to our backs—raised garden beds.
Definition of Raised Garden Beds
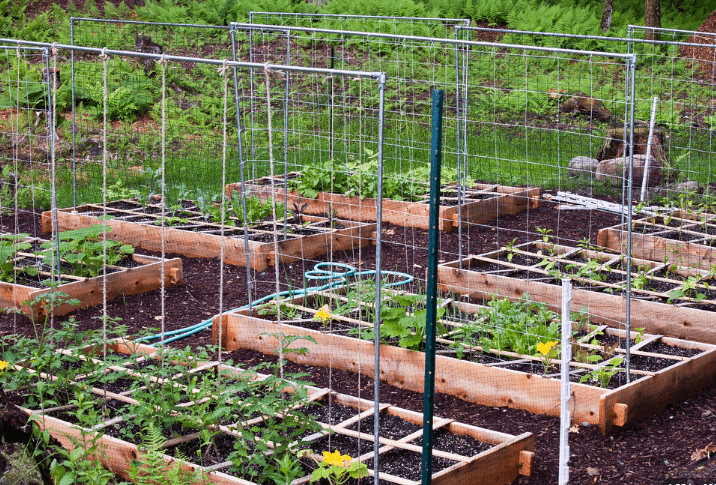
Let’s get down and dirty with the basics first. A raised garden bed is a garden plot that’s elevated above the natural ground level. Imagine giving your plants a VIP platform, complete with better drainage and less competition from local weeds. No more crawling on all fours to whisper sweet nothings to your carrots.
Importance and Benefits of Raised Garden Beds
Before we plant the seeds of your future raised bed garden, you might be asking, “Why should I elevate my gardening game?” Well, let me share some wisdom that has been cultivated over years of sunburns and bug bites.
Better Drainage
One of the hallmarks of raised garden beds is the impeccable drainage they offer. No more waterlogged soil that drowns your tomatoes in their own tears. Raised beds allow water to flow naturally, keeping the soil’s moisture level just right. Think of it as the Goldilocks of gardening conditions—not too wet, not too dry, but just right.
Easier on Your Back
Ah, the back—the gardener’s perennial nemesis. With raised beds, you can say goodbye to the awkward stooping and bending that transforms your gardening hobby into an Olympic-level gymnastics routine. Whether you’re 20 or 80, your back will thank you for the ergonomic relief.
Enhanced Soil Quality
Raised beds are like mini-fortresses for your garden soil. By elevating the soil, you can create a nutrient-rich paradise that is insulated from the compacted, often nutrient-depleted soil below. The raised bed becomes a concentrated hub of fertile earth, making your plants happier than a worm in compost.
Planning Your Raised Garden Bed
Ah, the planning stage—the time when your dreams sprout wings but haven’t yet been clipped by reality. Don’t skip this part; your future plants are counting on you for their 5-star accommodation.
1.1 Decide on Location
Before you start hammering away, let’s talk about your garden’s new home address. A few factors to consider:
Factors to Consider
- Sunlight: Plants are solar-powered, remember? Choose a spot that gets at least 6-8 hours of sunlight, especially if you’re planning on growing veggies. No one likes a tanned gardener with pale tomatoes.
- Accessibility: Make it a place you can easily get to, rain or shine. If you have to trek half a mile to get to your garden bed, the only thing that’ll be growing is your list of excuses.
- Water Source: Unless you fancy hauling buckets of water across your yard daily, choose a spot near a water source. A nearby hose or drip irrigation system will make your life much easier.
1.2 Selecting the Size and Shape
The second commandment of gardening is, “Thou shalt not limit thy imagination,” but maybe limit your bed size. Here’s how:
Common Shapes
- Rectangular: The classic, the timeless, the “I just want to plant things and not worry about geometry.”
- Square: Ideal for small spaces and perfect for playing 4-square when the plants are dormant. Just kidding—don’t step on the soil!
- L-Shaped: A fashionable twist on the rectangular bed, perfect for corners and a flair of architectural drama.
Size Considerations
- Available Space: Size your bed according to the real estate you have. A garden bed shouldn’t turn your yard into an obstacle course.
- What You Plan to Grow: Carrots don’t need much room; pumpkin vines might stage a yard coup if you’re not careful. Plan accordingly.
1.3 Budget and Costs
Last but not least, let’s talk money. After all, those heirloom seeds and cedarwood planks won’t pay for themselves.
Estimating Costs for Materials
Materials cost money, unless you’re bartering with your neighbor again (Steve, I’m looking at you). Here’s a rough breakdown:
- Wood: Around $50-$200, depending on type and size.
- Soil: Expect to shell out $20-$100, depending on quality and volume.
- Miscellaneous (screws, brackets, etc.): $10-$50.
| Material | Estimated Cost Range |
|---|---|
| Wood | $50-$200 |
| Soil | $20-$100 |
| Miscellaneous | $10-$50 |
Tools Required
Don’t forget, you’ll need some basic tools like:
- Hammer
- Screwdriver or drill
- Measuring tape
- Level
- Gloves
Building Your Raised Garden Bed
Alright, green warriors, let’s move from the dream phase to the ‘dirt under your nails’ phase. Time to build this raised bed like it’s a sandcastle for your plants.

2.1 Materials Needed
Before you run off to the lumberyard or start dismantling your picket fence (not advised), let’s get acquainted with the materials that’ll make your raised bed the envy of every worm in the neighborhood.
Types of Wood
- Cedar: The go-to for many gardeners. It’s rot-resistant and smells like a forest spa day. The downside? Your wallet might feel a tad lighter.
- Redwood: Another robust, rot-resistant choice. It’s pretty, but also pretty expensive.
- Pine: Affordable and easy to find. It’s the training wheels of garden bed materials. Just know it may rot sooner than Cedar or Redwood.
Alternatives
- Metal: Sleek, modern, and almost invincible. But if you’re growing edibles, ensure it’s not treated with chemicals.
- Stone: It won’t rot, but it may take a small army to put in place. Aesthetically pleasing but labor-intensive.
- Concrete: Sturdy and long-lasting, but make sure it’s not leaching lime into your soil.
Pros and Cons for Each Material
| Material | Pros | Cons |
|---|---|---|
| Cedar | Rot-resistant, smells great | Expensive |
| Redwood | Rot-resistant, aesthetically pleasing | Even more expensive |
| Pine | Affordable, easy to work with | Susceptible to rot |
| Metal | Durable, modern look | Possible chemical treatment |
| Stone | Long-lasting, beautiful | Heavy, labor-intensive |
| Concrete | Extremely durable | Potential for lime leaching |
2.2 Tools Required
You’ve got the materials; now you need the orchestra to play them. Let’s talk tools and safety gear.
List of Basic Tools
- Hammer: The John Lennon of tools; everything starts with a good hammering.
- Screwdriver or Drill: Depending on how fast you want those screws in.
- Measuring Tape: Because “eyeballing it” leads to a Leaning Tower of Peasa.
- Level: No one likes a wobbly bed—not even carrots.
Safety Gear
- Gloves: To protect your delicate artist hands.
- Safety Goggles: Because wood chips in your eyes are not a good look.
- Ear Protection: If you’re using power tools. Your ears will thank you.
2.3 Step-by-Step Construction Guide
The moment has come; it’s time to assemble the Avengers of garden beds!
Preparing the Ground
- Remove the Grass: No one likes an under-bed invasion.
- Level the Ground: Use your level and possibly a rake to get it as flat as a pancake.
- Lay Down a Weed Barrier: Trust me, it’s easier now than pulling weeds later.
Building the Frame
- Cut Your Material: Cut the planks to the size you’ve audaciously planned.
- Assemble the Sides: One by one, like you’re building a wooden puzzle for giants.
- Secure Corners: Use screws, brackets, or your overwhelming charisma.
Adding the Soil
- Test Soil pH: If you’re keen to get it just right.
- Pour the Soil: Shovel it in like you’re burying your past gardening mistakes.
- Tamp it Down: We want fluffy but firm—like a good pillow.
Section 3: How Deep Should Your Raised Bed Be?
Alright, folks, let’s talk depth—because in gardening, as in life, it’s not just the surface that counts. The depth of your raised bed is the VIP lounge for your plants’ roots. Let’s ensure we roll out the red carpet, shall we?

3.1 General Guidelines
So how deep should your penthouse suite for plants be? It all boils down to what you’re planning to grow.
Depth Considerations for Different Types of Plants
Below is a handy table to help you decide how deep your raised garden bed should be based on what you’re planning to grow. Please note that these are general guidelines; always check the specific needs of each plant variety you choose.
| Type of Plant | Recommended Depth (inches) | Notes |
|---|---|---|
| Leafy Greens | 6-12 | Spinach, lettuce, and other leafy greens prefer shallow beds. |
| Root Vegetables | 12-18 | Carrots, beets, and radishes need room for root growth. |
| Herbs | 6-12 | Most herbs are relatively shallow-rooted. |
| Flowers | 6-12 | Depth can vary widely; check individual species. |
| Bush Beans | 8-12 | These don’t require as much depth as pole beans. |
| Tomatoes | 12-18 | Deeper beds help support extensive root systems. |
| Squash & Pumpkins | 12-18 | These plants like room to spread their roots. |
| Corn | 12-18 | Corn has deep roots and benefits from deeper beds. |
| Perennials | 18+ | Since they live year-round, deeper is better. |
3.2 Pros and Cons of Various Depths
Each depth level has its own fan club and critics. Let’s weigh in.
6 Inches
| Pros | Cons |
|---|---|
| Water-efficient | Limited to shallow-rooted plants |
| Easier to fill | May dry out faster |
| Less expensive | Not ideal for root veggies |
12 Inches
| Pros | Cons |
|---|---|
| Good for most annuals | Requires more soil |
| More forgiving moisture balance | More expensive |
| Suitable for root vegetables |
18 Inches
| Pros | Cons |
|---|---|
| Great for perennials | Even more expensive |
| Excellent root development | Requires a LOT of soil |
| Allows for crop rotation | Could be overkill for annuals |
Water Conservation vs. Root Development
- Shallower Beds (6 inches): These are your water-saving heroes, but they might cramp the style of root vegetables.
- Deeper Beds (18 inches): While they’ll require more of that precious H2O, they’ll make your perennials feel like they’re in a five-star hotel.
Section 4: Maintenance and Care
Bravo! Your raised bed is now a living, breathing part of your garden. But wait, we’re not done. It’s like adopting a pet; you can’t just bring it home and expect it to fend for itself. Let’s delve into the self-care routine for your raised bed—because even gardens deserve a spa day.
4.1 Watering
Ah, watering—the nectar of plant life. But how much is too much? Or too little?
Drip Irrigation vs. Manual Watering
- Drip Irrigation: Imagine you’re at a posh restaurant and you get tiny, delicious bites of food at just the right intervals. That’s what drip irrigation is for plants. It’s efficient and conserves water.
- Manual Watering: This is the good ol’ bucket-and-spade method. It’s more labor-intensive but offers you the joy of a more “hands-on” approach, literally.
4.2 Soil Health
Just like you wouldn’t thrive on a diet of fast food, your plants need good nutrition too. Here’s how to serve up a Michelin-starred soil feast.
Adding Fertilizers and Compost
- Fertilizers: These are the vitamins of the plant world. But remember, balance is key—too much can be as harmful as too little.
- Compost: Think of it as the home-cooked meal for your plants. It enriches the soil, improves texture, and makes your plants feel loved and cared for.
4.3 Pest Control
Picture this: You’ve set up a lovely home, and suddenly uninvited guests show up and won’t leave. No, I’m not talking about your in-laws. It’s pests!
Natural Methods vs. Chemical Solutions
- Natural Methods: From insect-repelling plants to good old soap water, nature offers some organic eviction notices. Plus, you keep your garden eco-friendly.
- Chemical Solutions: Effective but use sparingly and cautiously. Always read the label, and maybe save these for when your plant is hosting a full-on bug rave.
Section 5: Frequently Asked Questions (FAQs)
So, you’ve got questions, huh? Don’t worry, it’s a sign of a curious mind—or maybe just a really perplexing gardening conundrum. Either way, let’s dig into these FAQs like they’re a treasure trove of gardening gold.
What is the best wood for a raised garden bed?
Cedar and Redwood are the Beyoncé and Jay-Z of woods for raised beds—fabulous, long-lasting, but a bit on the pricey side. Pine is your economical choice but may need replacing sooner.
How do I keep my raised bed from rotting?
Keep an eye out for good drainage, and opt for rot-resistant woods like Cedar or Redwood. Also, don’t forget to invite beneficial critters like earthworms that improve soil health.
Can I put a raised garden bed on concrete?
Yes, you can! But make sure you have a good drainage system in place, such as gravel at the bottom. And remember, the plants’ roots can’t dig down into the earth, so go deeper with the bed.
What soil should I use in my raised garden bed?
A mix of topsoil, compost, and other organic matter is the three-course dinner your plants crave. You can also get soil tests to nail down those micronutrients.
How do I protect my raised garden bed from pests?
Aside from an “Invitation Only” sign, consider natural repellents like marigolds or garlic. For more stubborn party-crashers, you might have to resort to chemical means, but use cautiously.
Is treated wood safe for raised garden beds?
Generally, it’s best to avoid chemically treated wood close to edible plants. Look for woods treated with non-toxic preservatives if you must go this route.
Do raised beds need drainage holes?
Not necessarily. Raised beds generally offer better drainage than in-ground beds. Just make sure the bottom layer is permeable to water.
How often should I water my raised garden bed?
A thumb rule is to keep the soil as moist as a wrung-out sponge. This may mean daily watering in hot conditions or less frequent in cooler, rainy climates.
Can I grow perennials in my raised bed?
Absolutely! Just remember, perennials like to settle in, so give them a deeper bed—around 18 inches should do.
How do I prepare my raised bed for winter?
If you’re not growing winter crops, consider a layer of mulch to protect the soil. In severe climates, you might want to dismantle the bed to prevent wood rot.
There you have it, folks! The nitty-gritty of raised garden beds unpacked.
And finally. I don’t often do this, but I want to recommend a book at the end. “Raised Bed Revolution” by Tara Nolan – If this article was the trailer, consider this book the full-length feature film on raised beds.
